Effective installation begins with a clear plan and verification of compatibility. Confirm vehicle roof ratings and roof rack crossbar spacing before unboxing the Yakima cargo box. Most modern crossbars and factory rails accept Yakima mounting hardware, but confirmation of dynamic roof load and rack capacity prevents overloading. Typical passenger SUV dynamic roof load ranges from 75 to 165 pounds; for example, many Toyota models list 75 kg (165 lb) as maximum. Match that to the cargo box empty weight plus intended cargo weight.
Practical step-by-step procedures and safety checks
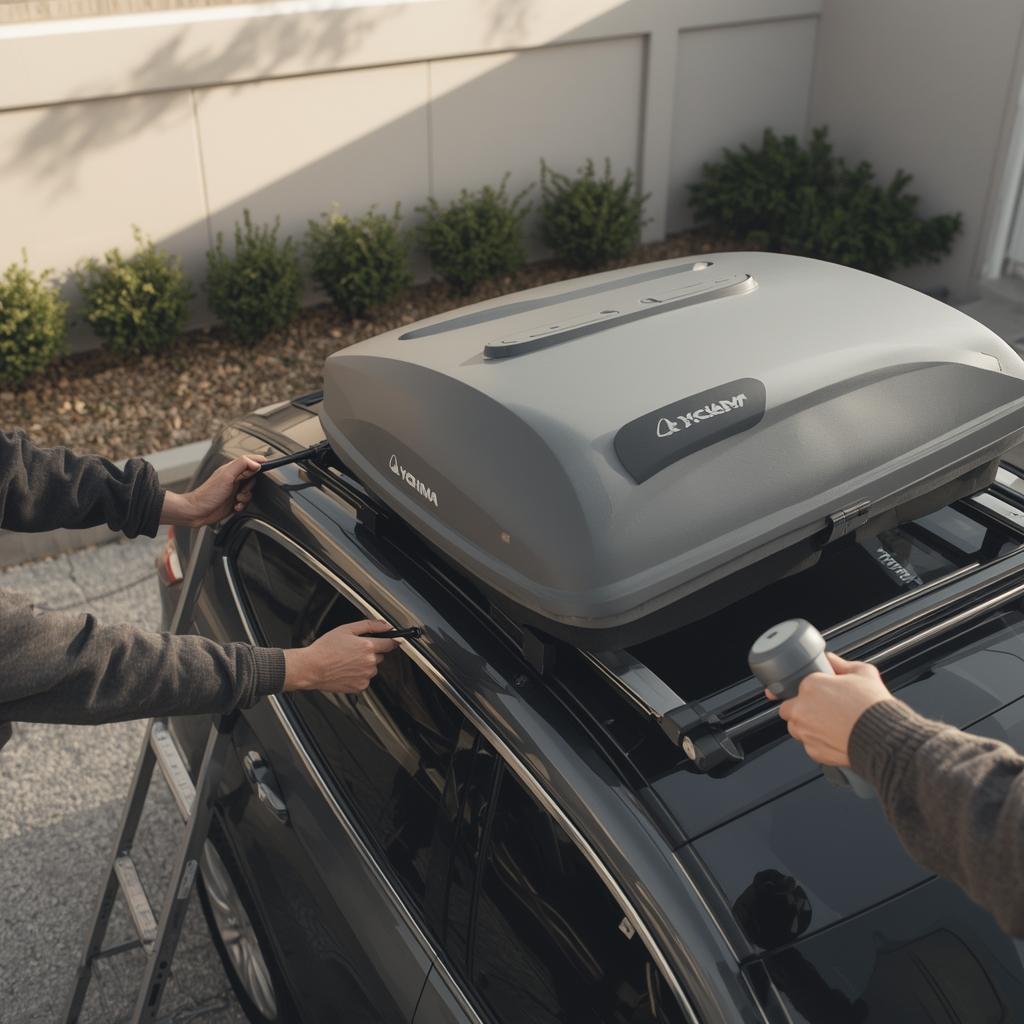
Start by choosing the right Yakima cargo box model for cargo capacity and vehicle profile. Popular options include the SkyBox 12 and SkyBox 16 for general gear, and higher-capacity boxes for long trips. Confirm that the box length fits within garage clearance and does not exceed vehicle overhang limits. Gather tools: torque wrench able to measure 6–12 ft·lb, 10 mm and 13 mm sockets, a screwdriver set, a marker, and a soft blanket to rest the box on while mounting.
Cleaning and inspection are critical. Remove road grime from crossbars and roof rails, inspect for corrosion or loose mounting hardware, and verify crossbar stiffness. Position the cargo box on the roof with two people to avoid damage. Centering matters: align the box visually with roof centerline and then measure 50/50 distance from box edges to door pillars. Align the box mounting points to the crossbar locations specified in the Yakima instructions.
The following chart summarizes common mounting components, their role, and recommended tightening ranges. Place this reference in the middle of the mounting workflow and consult it when fastening.
| Component | Typical function | Recommended tightening range | Required tool |
|---|---|---|---|
| T-bolt clamp | Sliding anchor for crossbar channels | 6–8 ft·lb (8–11 Nm) | 13 mm socket or torque wrench |
| U-bolt set | Wraps around round crossbars | 8–10 ft·lb (11–14 Nm) | 10 mm socket |
| Quick-release clamp | Tool-free initial positioning | Hand tight then 6 ft·lb final | Torque wrench |
| Lock cylinder assembly | Secures lid and prevents theft | Torque per Yakima spec; finger snug for barrel | 3 mm hex for set screw |
| Base bracket plate | Spreads load across crossbar | Tighten in sequence to specified torque | Torque wrench |
After aligning mounting points, attach Yakima brackets and clamps in the sequence recommended by Yakima: install base plates first, loosely fit all fasteners to allow final positional adjustments, then tighten progressively in alternating sequence. Correct torque is important to prevent loosening or crushing the crossbar. A torque wrench set between 6 and 10 ft·lb is adequate for most Yakima fittings. Recheck torque after the first 50 miles of driving.
Install and test locking mechanisms before loading. Yakima key cylinders should operate smoothly; lubricate with graphite if sticky. Verify lid clearance for rear hatch and side doors by opening them fully and observing any contact points. Check antenna position and satellite roof components to avoid interference. Measure overall roof height so entry into low clearances like parking garages remains safe. Note typical rooftop cargo box adds between 6 and 18 inches of height depending on model; record final vehicle height on a sticker near the driver.
Load distribution determines handling and safety. Place heavy items near the center of the box and toward the front of the vehicle to limit rearward sway. Respect both the vehicle roof load and the cargo box maximum load. Secure gear inside using straps or internal partitions to prevent shifting. For winter travel, ensure soft items sit at the ends to cushion and maintain box seal integrity.
Weatherproofing and noise management extend the life of the installation. Inspect lid seals for gaps and debris, reseat seals if necessary, and apply silicone lubricant to keep them supple. Road noise and wind buffeting can be reduced by sliding the box slightly aft or forward in small increments; test at highway speeds and adjust for minimum vibration. Aerodynamic fit often improves fuel consumption and reduces noise compared to improperly centered boxes.
Two-person installs reduce risk. One person steadies the cargo box while the second fits hardware, ensuring accurate alignment. For rooftop handling, use a soft blanket to protect the box and roof paint. If problems arise, common faults include incorrect clamp orientation, missing spacer washers, and under-torqued bolts. Reconfirm that crossbar channels are parallel and not obstructed.
A short safety checklist before departure saves roadside fixes. Verify all fasteners torqued to spec, locks engaged, no items protruding, and rear hatch clearance confirmed. Reinspect after the first 10 miles and at every major stop. Routine maintenance after installation includes periodic torque checks, seal inspection, and cleaning of drainage channels.
When removing for storage, loosen fasteners in reverse sequence, lift with two people, clean and dry the box thoroughly, and store in a cool dry place away from direct sunlight. Recommended Yakima accessories include a tie-down kit, an internal organizer, and an extra key pack. Seasonal care involves UV-protective cleaner and keeping hinges lightly lubricated. Properly maintained, a Yakima rooftop cargo box delivers reliable, low-noise performance and safe transport for years of trips.